guides keyboard image

What you'll need to follow this guide:

  • Terraform >12.13 & understanding of basic Terraform usage
  • AWS API Access, preferably with admin-level permissions
  • Bitbucket Repository with Pipelines enabled
  • An EC2 Instance you wish to push your code repository contents to

Concept:

Using Bitbucket Pipelines and Bitbucket Deploy, we will set up automatic pushes to an EC2 Instance with AWS CodeDeploy. Target EC2 Instance does not need to be publicaly accessible in any way for this approach.


Benefits:

  • A non-SSH approach - Unlike webhooks to Jenkins or other scripts that Rsync, this method will allow you to stay behind firewalls and/or private subnets within your AWS VPC
  • Lean on IAM for tighter authorization of AWS resources
  • Pipelines offer a world of options in continuous integration and delivery practices and tools
  • No internal EC2 instances running to support deployment

Costs:

  • AWS CodeDeploy - ~$0.02 per deployment, per instance (priced from us-west-2)
  • S3 standard storage costs apply

Implementation Guide:

Included are some hints in Terraform code that you can adapt to your needs. Please modify it accordingly to your needs and environemnt.

1. Create IAM User with Direct Policy Attachment for Bitbucket.

The basic goal of this step is to screate an IAM user and a direct policy for Bitbucket, as well as an S3 bucket, which will be where you upload your repository artifacts. An IAM user controls access to specific AWS resources that will be used in this guide.

For obvious reasons, you will want to call your bucket something else and change the bucket name.

resource "aws_s3_bucket" "example_bucket" {
  bucket = "example-bucket"
  region = "us-west-2"
  acl    = "private"
  force_destroy = false
  server_side_encryption_configuration {
    rule {
      apply_server_side_encryption_by_default {
        sse_algorithm = "AES256"
      }
    }
  }
  versioning {
    enabled = false
  }
}

resource "aws_iam_user" "bitbucket" {
  name = "bitbucket"
  path = "/"
}

resource "aws_iam_access_key" "bitbucket" {
  user = "${aws_iam_user.bitbucket_pipeplines.name}"
}

resource "aws_iam_user_policy" "bitbucket" {
  name        = "bitbucket"
  user        = "${aws_iam_user.bitbucket.name}"
  policy = <<EOF
{
    "Version": "2012-10-17",
    "Statement": [
        {
            "Sid": "VisualEditor0",
            "Effect": "Allow",
            "Action": [
                "s3:GetAccessPoint",
                "s3:PutAccountPublicAccessBlock",
                "s3:GetAccountPublicAccessBlock",
                "s3:ListAllMyBuckets",
                "s3:ListAccessPoints",
                "s3:ListJobs",
                "s3:CreateJob",
                "s3:HeadBucket"
            ],
            "Resource": "*"
        },
        {
            "Sid": "VisualEditor1",
            "Effect": "Allow",
            "Action": "s3:*",
            "Resource": ["arn:aws:s3:::example-bucket/*"]
        },
    ]
}
EOF
}
After your terraform apply, you should now have an IAM user created for Bitbucket to work with.

2. Create a separate IAM role & policy for your EC2 Instance that will be able to use CodeDeploy.

We will be using an IAM role to attach to an EC2 instance; the IAM policy will drive what actions and AWS resources the role will be able to perform once it is attached to an instance.

It will need to read the same S3 bucket and have access to codedeploy, along with the proper trust relationship for the service and will be attached to your EC2 instance:

resource "aws_iam_policy" "codedeploy_ec2" {
  name        = "codedeploy-ec2"
  policy = <<EOF
{
    "Version": "2012-10-17",
    "Statement": [
        {
            "Sid": "VisualEditor0",
            "Effect": "Allow",
            "Action": [
                "s3:GetAccessPoint",
                "s3:PutAccountPublicAccessBlock",
                "s3:GetAccountPublicAccessBlock",
                "s3:ListAllMyBuckets",
                "s3:ListAccessPoints",
                "s3:ListJobs",
                "s3:CreateJob",
                "s3:HeadBucket"
            ],
            "Resource": "*"
        },
        {
          "Sid": "VisualEditor1",
          "Effect": "Allow",
          "Action": [
            "s3:Get*",
            "s3:List*"
          ],
          "Resource": [
            "arn:aws:s3:::example-bucket/*"]
        },
        {
            "Action": "codedeploy:*",
            "Effect": "Allow",
            "Resource": "*"
        },
        {
            "Action": "cloudwatch:*",
            "Effect": "Allow",
            "Resource": "*"
        },         
{
            "Effect": "Allow",
            "Action": [
                "autoscaling:CompleteLifecycleAction",
                "autoscaling:DeleteLifecycleHook",
                "autoscaling:DescribeAutoScalingGroups",
                "autoscaling:DescribeLifecycleHooks",
                "autoscaling:PutLifecycleHook",
                "autoscaling:RecordLifecycleActionHeartbeat",
                "autoscaling:CreateAutoScalingGroup",
                "autoscaling:UpdateAutoScalingGroup",
                "autoscaling:EnableMetricsCollection",
                "autoscaling:DescribeAutoScalingGroups",
                "autoscaling:DescribePolicies",
                "autoscaling:DescribeScheduledActions",
                "autoscaling:DescribeNotificationConfigurations",
                "autoscaling:DescribeLifecycleHooks",
                "autoscaling:SuspendProcesses",
                "autoscaling:ResumeProcesses",
                "autoscaling:AttachLoadBalancers",
                "autoscaling:PutScalingPolicy",
                "autoscaling:PutScheduledUpdateGroupAction",
                "autoscaling:PutNotificationConfiguration",
                "autoscaling:PutLifecycleHook",
                "autoscaling:DescribeScalingActivities",
                "autoscaling:DeleteAutoScalingGroup",
                "ec2:DescribeInstances",
                "ec2:DescribeInstanceStatus",
                "ec2:TerminateInstances",
                "tag:GetResources",
                "sns:Publish",
                "cloudwatch:DescribeAlarms",
                "cloudwatch:PutMetricAlarm",
                "elasticloadbalancing:DescribeLoadBalancers",
                "elasticloadbalancing:DescribeInstanceHealth",
                "elasticloadbalancing:RegisterInstancesWithLoadBalancer",
                "elasticloadbalancing:DeregisterInstancesFromLoadBalancer",
                "elasticloadbalancing:DescribeTargetGroups",
                "elasticloadbalancing:DescribeTargetHealth",
                "elasticloadbalancing:RegisterTargets",
                "elasticloadbalancing:DeregisterTargets"
            ],
            "Resource": "*"
        }, 
        {
            "Sid": "CodeStarNotificationsReadWriteAccess",
            "Effect": "Allow",
            "Action": [
                "codestar-notifications:CreateNotificationRule",
                "codestar-notifications:DescribeNotificationRule",
                "codestar-notifications:UpdateNotificationRule",
                "codestar-notifications:DeleteNotificationRule",
                "codestar-notifications:Subscribe",
                "codestar-notifications:Unsubscribe"
            ],
            "Resource": "*",
            "Condition": {
                "StringLike": {
                    "codestar-notifications:NotificationsForResource": "arn:aws:codedeploy:*"
                }
            }
        },
        {
            "Sid": "CodeStarNotificationsListAccess",
            "Effect": "Allow",
            "Action": [
                "codestar-notifications:ListNotificationRules",
                "codestar-notifications:ListTargets",
                "codestar-notifications:ListTagsforResource",
                "codestar-notifications:ListEventTypes"
            ],
            "Resource": "*"
        },
        {
            "Sid": "CodeStarNotificationsSNSTopicCreateAccess",
            "Effect": "Allow",
            "Action": [
                "sns:CreateTopic",
                "sns:SetTopicAttributes"
            ],
            "Resource": "arn:aws:sns:*:*:codestar-notifications*"
        },
        {
            "Sid": "SNSTopicListAccess",
            "Effect": "Allow",
            "Action": [
                "sns:ListTopics"
            ],
            "Resource": "*"
        }
    ]
}
EOF
}

// IAM trust relationship
data "aws_iam_policy_document" "codedeploy_ec2" {
  statement {
    actions = ["sts:AssumeRole"]

    principals {
      type        = "Service"
      identifiers = ["ec2.amazonaws.com",
                    "codedeploy.amazonaws.com"
                    ]
    }
  }
}
resource "aws_iam_role" "codedeploy_ec2" {
  name = "codedeploy-ec2"
  assume_role_policy = "${data.aws_iam_policy_document.codedeploy_ec2.json}"
}

resource "aws_iam_policy_attachment" "codedeploy_ec2" {
  name       = "codedeploy-ec2"
  roles      = ["${aws_iam_role.codedeploy_ec2.name}"]
  policy_arn = "${aws_iam_policy.codedeploy_ec2.arn}"
}

// Attach the role to your instance:
resource "aws_iam_instance_profile" "codedeploy_ec2" {
  name = "codedeploy-ec2"
  role = "${aws_iam_role.codedeploy_ec2.name}"
}

// You will need a real AMI for this, the iam_intance_profile is what's important
resource "aws_instance" "example_instance" {
  ami           = "placeholder"
  iam_instance_profile = "${aws_iam_instance_profile.codedeploy_ec2.name}"
  instance_type = "t2.micro"

  tags = {
    Name = "example_instance"
  }
}

After your terraform apply, your IAM role will have the permissions it needs to work with CodeDeploy, S3, and is ready to be attached to an EC2 Instance.

3. Create CodeDeploy app, deployment group, and deployment config.

To get started with CodeDeploy, you will need three things:

  • deployment app name (we'll call ‘app’ in this guide)
  • deployment group
  • deployment config for your application

This step's goal is to configure CodeDeploy to push to your EC2 Instance which we'll call in this guide ‘example_instance’:

resource "aws_codedeploy_app" "app" {
  compute_platform = "Server"
  name             = "app"
}

resource "aws_codedeploy_deployment_config" "app" {
  deployment_config_name = "app"

  minimum_healthy_hosts {
    type  = "FLEET_PERCENT"
    value = 50
  }
}

resource "aws_codedeploy_deployment_group" "app" {
  app_name               = "${aws_codedeploy_app.app.name}"
  deployment_group_name  = "app"
  service_role_arn       = "${aws_iam_role.codedeploy_ec2.arn}"
  deployment_config_name = "CodeDeployDefault.OneAtATime"

  ec2_tag_set {
      ec2_tag_filter {
          key   = "Name"
          type  = "KEY_AND_VALUE"
          value = "example_instance"
      }
  }
  auto_rollback_configuration {
    enabled = true
    events  = ["DEPLOYMENT_FAILURE"]
  }

  alarm_configuration {
    alarms  = ["app-deployment"]
    enabled = true
  }
}
After you terraform apply the above, you will now have all 3 required resources for a complete CodeDeploy setup on AWS.

4. Create CodeDeploy appspec.yml and Lifecycle Hook scripts.

To complete CodeDeploy setup, you will need to create an appspec.yml and some scripts for lifecycle hooks to check into your repository root directory. The appspec.yml file will control the CodeDeploy lifecycle hooks (or steps) that you will want to use to deploy your code. There are many lifecycle hooks but this guide will cover the 3 basic lifecycle hooks:

  • BeforeInstall - the script you want to run before copying code to the desired location on the server examples: backing up a configuration file to a different location, stopping the application

  • AfterInstall - the script you want to run after code is copied to the desired location on the server examples: running a database migration, installing packages or modules your updated code will depend on

  • ApplicationStart - the script, or command to start or restart your application examples: init.d, systemctl, or custom startup scripts    

  • appspec.yml:

version: 0.0
os: linux 
files:
  - source: /
    destination: /example/destination/folder/  
hooks:
  BeforeInstall:
    - location: scripts/before_install.sh
      timeout: 120
      runas: ubuntu
  AfterInstall:
    - location: scripts/after_install.sh
      timeout: 120
      runas: ubuntu
  ApplicationStart:
    - location: scripts/application_start.sh
      timeout: 120
      runas: ubuntu

And for the scripts mentioned in appspec.yml:

  • scripts/before_install.sh:
#!/bin/bash
#example: service stop app
  • scripts/after_install.sh:
#!/bin/bash
#example: pip install -r requirements.txt
  • scripts/application_start.sh:
#!/bin/bash
#example: service restart app
This will give you the basic setup for controlling what CodeDeploy does at each step of the deployment.

I highly encourate you to expand on these scripts and make them as elaborate as your needs require. It's just bash, after all!


5. Attach IAM Instance role and install the CodeDeploy Agent on your Instance.

Now, back to the IAM role we created in step 2 – Ensure the EC2 Instance has the ‘codedeploy-ec2’ role attached and then install the CodeDeploy Agent. The agent runs locally on the EC2 Instance and will be responsible for honoring the steps you specified in appspec.yml. I won't be re-typing those instructions but they can be found at this link: https://docs.aws.amazon.com/codedeploy/latest/userguide/codedeploy-agent-operations-install.html  
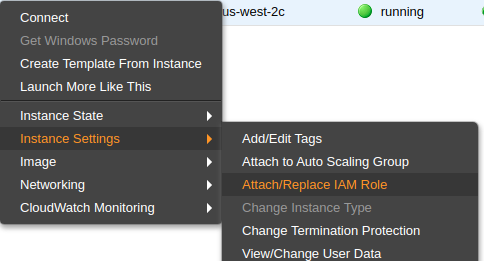
  You can attach the role via AWS console by right clicking on the Instance > Instance Settings > Attach/Replace IAM Role instance attachment screenshot Or you can ensure that your Terraform code includes the following line: iam_instance_profile = "${aws_iam_instance_profile.codedeploy_ec2.name}" within the aws_instance resource of the host you are working on  
 

Ideally, the IAM role ‘codedeploy-ec2’ is attached prior to starting the codedeploy-agent for the first time, else it will complain. If you happen to install the agent prior to attaching the role to the instance, just reboot the instance.

6. Enable Bitbucket Pipelines for your code repository.

Next, we will enable Bitbucket Pipelines for your repo by going to your repository Settings > Pipelines > Enable show pipelines are enabled

This will enable Bitbucket pipelines to operate on your repository.

7. Create a bitbucket-pipelines.yml in your code repository.

Create a bitbucket-pipelines.yml file for your repo. The pipelines file will control what Bitbucket is supposed to do with your code when you push to a given branch. You can also perform different actions by branch name within steps. This example will do most of the heavy-lifting on commits to the master branch:    

  • bitbucket-pipelines.yml:
image: atlassian/default-image:2

pipelines:
  default:
    - step:
        script:
          - echo "This script runs on all branches that don't have any specific pipeline assigned in 'branches'."  
  branches:
    development:
      - step:
          script:
            - echo "development scripts like lint"   
    master:        
      - step:
          name: Build to S3
          script:
            - apt-get update
            - apt-get install -y zip
            - zip -r app.zip .
            - pipe: atlassian/aws-code-deploy:0.3.2
              variables:
                AWS_DEFAULT_REGION: $AWS_DEFAULT_REGION
                AWS_ACCESS_KEY_ID: $AWS_ACCESS_KEY_ID
                AWS_SECRET_ACCESS_KEY: $AWS_SECRET_ACCESS_KEY
                APPLICATION_NAME: $APPLICATION_NAME
                S3_BUCKET: $S3_BUCKET
                COMMAND: 'upload'
                ZIP_FILE: 'app.zip'
                VERSION_LABEL: 'app-1.0.0'p       
      - step:
          name: Deploy build with CodeDeploy
          script:                 
            - pipe: atlassian/aws-code-deploy:0.3.2
              variables:
                AWS_DEFAULT_REGION: $AWS_DEFAULT_REGION
                AWS_ACCESS_KEY_ID: $AWS_ACCESS_KEY_ID
                AWS_SECRET_ACCESS_KEY: $AWS_SECRET_ACCESS_KEY
                APPLICATION_NAME: $APPLICATION_NAME
                DEPLOYMENT_GROUP: $DEPLOYMENT_GROUP
                S3_BUCKET: $S3_BUCKET
                COMMAND: 'deploy'
                WAIT: 'true'
                VERSION_LABEL: 'app-1.0.0'
                IGNORE_APPLICATION_STOP_FAILURES: 'true'
                FILE_EXISTS_BEHAVIOR: 'OVERWRITE'
This will tell Bitbucket what to do with your code once you commit it to a certain branch.

The default steps will execute for any branches you don't specify but this layout should give you a good idea of what you can do with teh bitbucket-pipelines.yml file. Also note the usage of pipe: atlassian/aws-code-deploy:0.3.2, which is a shortcut reference to an Atlassian-managed Docker container that is already set up to work with CodeDeploy using the Environment Variables we will cover in the next step.


8. Configure Bitbucket Pipelines Environment Variables in your code repository.

You will notice some environment variables in the previous step – Ensure the variables in bitbucket-pipelines.yml are configured properly.    

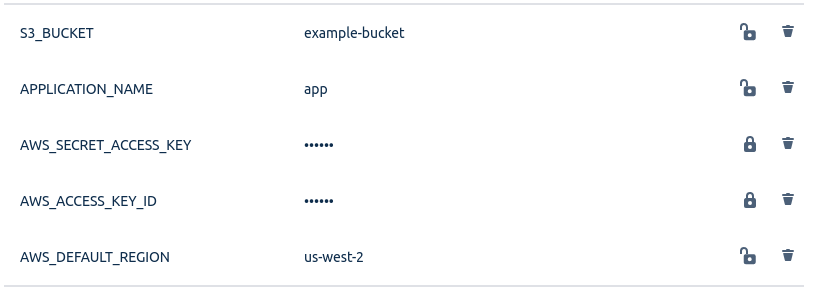
In your Bitbucket repository, go to Settings > Repository Variables be sure to set values for:

  • AWS_DEFAULT_REGION
  • AWS_ACCESS_KEY_ID (of the IAM user in step1)
  • AWS_SECRET_ACCESS_KEY (of the IAM user in step1)
  • APPLICATION_NAME
  • S3_BUCKET

example env vars

Now your bitbucket-pipelines.yml should be ready for action

9. Commit changes to Bitbucket and Push to Master branch

Commit your changes & push it all up to the master branch of repository and watch the magic happen – pipelineous automaticus!


Closing

If everything goes according to plan, and you've modified Terraform to fit your setup, you should be happily on your adventure with automated continuous deployment using Bitbucket Pipelines with AWS CodeDeploy.


Considerations

  • AWS S3 Lifecycle Policies can help keep your storage costs in check
  • CodeDeploy configs allow for myriad deployment methods, choose the one that is right for your stack with regards to uptime
  • Rollback triggers aren't a must but they're a great idea
  • Encourage development staff to work on maturing bitbucket-pipelines for their codebase - it only makes quality better for everyone
  • Of course you can do this all in AWS Console and skip Terraform entirely